- Indice guida completa
- ExtJS: download e documentazione
- Esempio finale dell’articolo
Negli articoli preceenti abbiamo visto come creare e raffinare un Border Layout. Vediamo adesso come creare un TabPanel, per fare questo partiamo dalla struttura creata precedentemente.
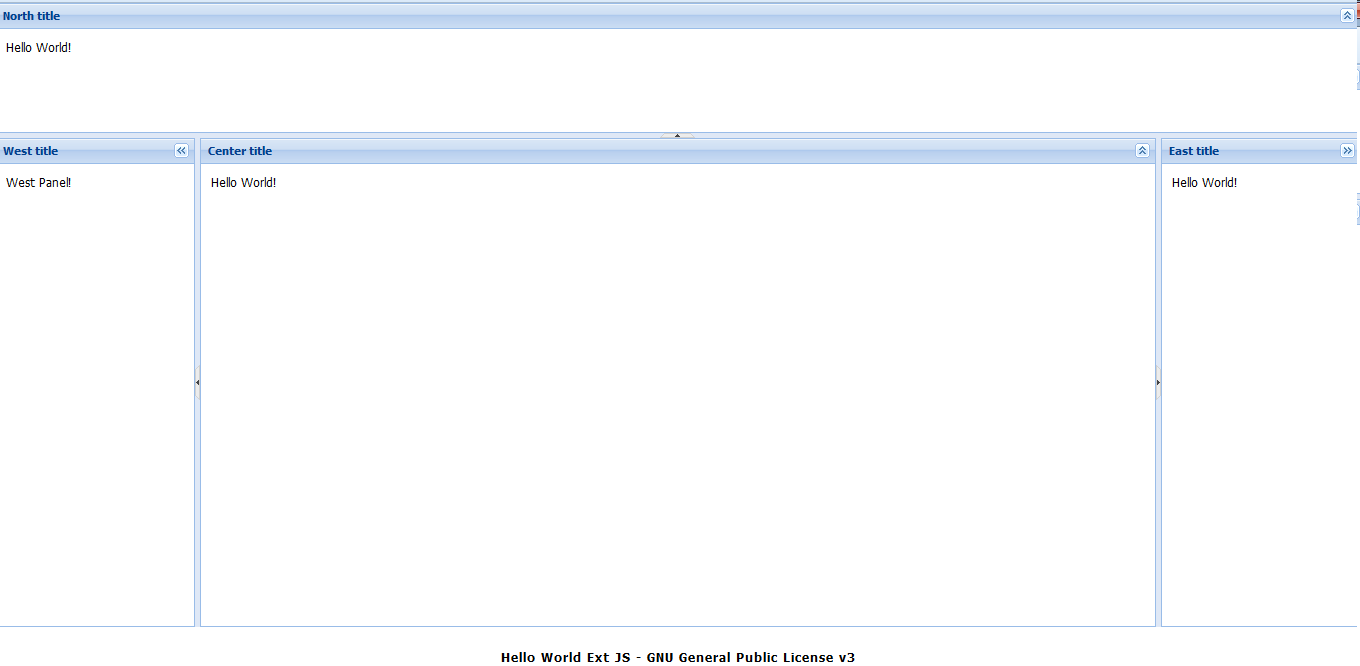
Esempio di un Extjs TabPanel
Creaiamo e inseriamo il TabPanel nella porzione centrale del nostro layout, ma prima per rendere il tutto più gradevole eliminiamo l’header ed il padding. Sarà anche necessario togliere l’attributo contentEl, poichè il contenuto non sarà più proveniente da un div ma sarà il TabPanel stesso.
Infine aggiungiamo il campo items: [] all’interno della regione centrale del layout e creiamo il pannello al suo interno:
{
    region: 'center',
    header: false,
    bodyStyle: 'padding: 0;',
    layout: 'fit',
    height: '100%',
    items: [
        tabs = Ext.create('Ext.tab.Panel', {
            defaults: {
                bodyStyle: 'padding: 10px;',
                border: false,
            },
            items: [{
                title: 'Home',
                itemId: 'home',
                html: 'Home Page'
            }, {
                title: 'Page 1',
                itemId: 'page1',
                html: 'Page 1'
            }, {
                title: 'Page 2',
                itemId: 'page2',
                html: 'Page 2'
            }, {
                title: 'Page 3',
                itemId: 'page3',
                html: 'Page 3'
            }, {
                title: 'Page 4',
                itemId: 'page4',
                html: 'Page 4',
                listeners: {
                    activate: function(tab, eOpts) {
                        alert('This is the Last Page!');
                    }
                }
            }]
        })
    ]
}
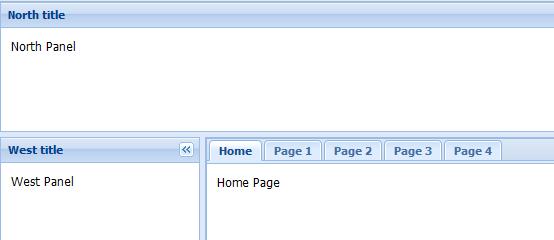
Abbiamo dunque creato un TabPanel avente 5 schede il cui contenuto è una semplice stringa. Ogni scheda è a sua volta un pannello e potrebbe contenere la qualunque (ad esempio anche un altro TabPanel).
Si noti che abbiamo anche aggiunto un listener che cattura l’aperta dell’ultima scheda e lancia un messaggio. Il codice utilizzato per fare ciò è molto semplice ed auto esplicativo
                listeners: {
                    activate: function(tab, eOpts) {
                        alert('This is the Last Page!');
                    }
                }
- Esempio finale dell’articolo
- Prossimo Articolo: Utilizzo del Deag and Drop
- Indice guida completa